Redis在项目中的使用(JedisPool方式)
收藏
在数据库实战开发的过程中,我们经常会遇到一些这样那样的问题,然后要卡好半天,等问题解决了才发现原来一些细节知识点还是没有掌握好。今天golang学习网就整理分享《Redis在项目中的使用(JedisPool方式)》,聊聊使用、JedisPoolRedis,希望可以帮助到正在努力赚钱的你。
springboot中redis相关配置
1、pom.xml中引入依赖
     redis.clients


     jedis


     2.9.0
2、springboot的习惯优于配置。也在项目中使用了application.yml文件配置mysql的基本配置项。这里也在application.yml里面配置redis的配置项。
spring:
  datasource:
        # 驱动配置信息
        url: jdbc:mysql://localhost:3306/spring_boot?useUnicode=true&characterEncoding=utf8
        username: root
        password: root
        type: com.alibaba.druid.pool.DruidDataSource
        driver-class-name: com.mysql.jdbc.Driver

        # 连接池的配置信息
        filters: stat
        maxActive: 20
        initialSize: 1
        maxWait: 60000
        minIdle: 1
        timeBetweenEvictionRunsMillis: 60000
        minEvictableIdleTimeMillis: 300000
        validationQuery: select 'x'
        testWhileIdle: true
        testOnBorrow: false
        testOnReturn: false
        poolPreparedStatements: true
        maxOpenPreparedStatements: 20
  redis:
        host: 127.0.0.1
        port: 6379
        password: pass1234
        pool:
          max-active: 100
          max-idle: 10
          max-wait: 100000
        timeout: 0
springboot中redis相关类
- 项目操作redis是使用的RedisTemplate方式,另外还可以完全使用JedisPool和Jedis来操作redis。整合的内容也是从网上收集整合而来,网上整合的方式和方法非常的多,有使用注解形式的,有使用Jackson2JsonRedisSerializer来序列化和反序列化key value的值等等,很多很多。这里使用的是我认为比较容易理解和掌握的,基于JedisPool配置,使用RedisTemplate来操作redis的方式。
redis单独放在一个包redis里,在包里先创建RedisConfig.java文件。
RedisConfig.java
@Configuration
@EnableAutoConfiguration
public class RedisConfig {

    @Bean
    @ConfigurationProperties(prefix = "spring.redis.pool")
    public JedisPoolConfig getRedisConfig(){
        JedisPoolConfig config = new JedisPoolConfig();
        return config;
    }

    @Bean
    @ConfigurationProperties(prefix = "spring.redis")
    public JedisConnectionFactory getConnectionFactory() {
        JedisConnectionFactory factory = new JedisConnectionFactory();
        factory.setUsePool(true);
        JedisPoolConfig config = getRedisConfig();
        factory.setPoolConfig(config);
        return factory;
    }

    @Bean
    public RedisTemplate getRedisTemplate() {
        JedisConnectionFactory factory = getConnectionFactory();
        RedisTemplate template = new StringRedisTemplate(factory);
        return template;
    }

}
- 在包里创建RedisService接口的实现类RedisServiceImpl,这个类实现了接口的所有方法。
RedisServiceImpl.java
@Service("redisService")
public class RedisServiceImpl implements RedisService {

    @Resource
    private RedisTemplate

     redisTemplate;

    @Override
    public boolean set(final String key, final String value) {
        boolean result = redisTemplate.execute(new RedisCallback

     () { @Override public Boolean doInRedis(RedisConnection connection) throws DataAccessException { RedisSerializer

       serializer = redisTemplate.getStringSerializer(); connection.set(serializer.serialize(key), serializer.serialize(value)); return true; } }); return result; } @Override public String get(final String key) { String result = redisTemplate.execute(new RedisCallback

       () { @Override public String doInRedis(RedisConnection connection) throws DataAccessException { RedisSerializer

         serializer = redisTemplate.getStringSerializer(); byte[] value = connection.get(serializer.serialize(key)); return serializer.deserialize(value); } }); return result; } @Override public boolean expire(final String key, long expire) { return redisTemplate.expire(key, expire, TimeUnit.SECONDS); } @Override public boolean remove(final String key) { boolean result = redisTemplate.execute(new RedisCallback

         () { @Override public Boolean doInRedis(RedisConnection connection) throws DataAccessException { RedisSerializer

           serializer = redisTemplate.getStringSerializer(); connection.del(key.getBytes()); return true; } }); return result; } }
在这里execute()方法具体的底层没有去研究,只知道这样能实现对于redis数据的操作。
redis保存的数据会在内存和硬盘上存储,所以需要做序列化;这个里面使用的StringRedisSerializer来做序列化,不过这个方式的泛型指定的是String,只能传String进来。所以项目中采用json字符串做redis的交互。
到此,redis在springboot中的整合已经完毕,下面就来测试使用一下。
5. springboot项目中使用redis
在这里就直接使用springboot项目中自带的单元测试类SpringbootApplicationTests进行测试。
@RunWith(SpringRunner.class)
@SpringBootTest
public class SpringbootApplicationTests {
private JSONObject json = new JSONObject();
@Autowired
private RedisService redisService;
@Test
public void contextLoads() throws Exception {
}
/**
* 插入字符串
*/
@Test
public void setString() {
redisService.set("redis_string_test", "springboot redis test");
}
/**
* 获取字符串
*/
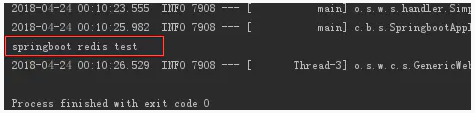
@Test
public void getString() {
String result = redisService.get("redis_string_test");
System.out.println(result);
}
/**
* 插入对象
*/
@Test
public void setObject() {
Person person = new Person("person", "male");
redisService.set("redis_obj_test", json.toJSONString(person));
}
/**
* 获取对象
*/
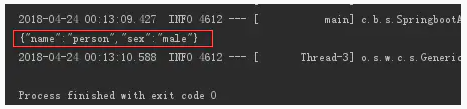
@Test
public void getObject() {
String result = redisService.get("redis_obj_test");
Person person = json.parseObject(result, Person.class);
System.out.println(json.toJSONString(person));
}
/**
* 插入对象List
*/
@Test
public void setList() {
Person person1 = new Person("person1", "male");
Person person2 = new Person("person2", "female");
Person person3 = new Person("person3", "male");
List
list = new ArrayList();
list.add(person1);
list.add(person2);
list.add(person3);
redisService.set("redis_list_test", json.toJSONString(list));
}
/**
* 获取list
*/
@Test
public void getList() {
String result = redisService.get("redis_list_test");
List
list = json.parseArray(result, String.class); System.out.println(list); } @Test public void remove() { redisService.remove("redis_test"); } } class Person { private String name; private String sex; public Person() { } public Person(String name, String sex) { this.name = name; this.sex = sex; } public String getName() { return name; } public void setName(String name) { this.name = name; } public String getSex() { return sex; } public void setSex(String sex) { this.sex = sex; } }
在这里先是用@Autowired注解把redisService注入进来,然后由于是使用json字符串进行交互,所以引入fastjson的JSONObject类。然后为了方便,直接在这个测试类里面加了一个Person的内部类。
一共测试了:对于string类型的存取,对于object类型的存取,对于list类型的存取,其实本质都是转成了json字符串。还有就是根据key来执行remove操作。
获取字符串:
获取对象:
获取list:

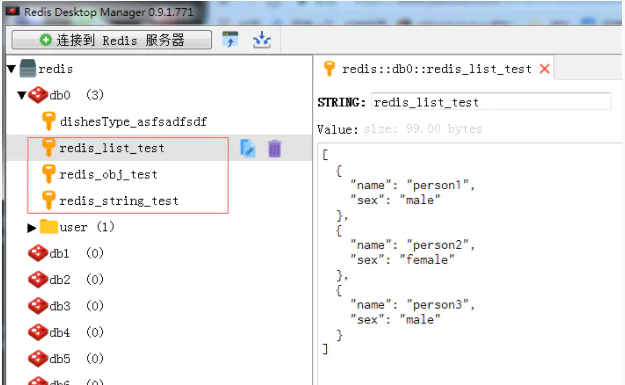
redis管理客户端数据:
到此,测试完成,对于常用的一些数据类型的转换存取操作也基本调试通过。所以本文对于springboot整合redis到此结束。